

Getting a Node.js application working locally is the easy part; learning to deploy Node.js on VPS hosting the right way is what keeps it online. Deploying it to a Linux VPS and keeping it running reliably under real-world conditions — surviving crashes, server reboots, traffic spikes, and SSL requirements — is where most developers hit friction for the first time.
The most common failure patterns are:
- The app runs manually but stops when you close the SSH session
- The app runs but is not accessible from the browser because it is not proxied through port 80/443
- The app restarts after a server reboot and everything breaks until someone SSH-es in and restarts it manually
This guide addresses all of these with a clean, production-ready setup using PM2 for process management and Nginx as a reverse proxy.
What you need before starting
- A Linux VPS running Ubuntu 22.04 or 24.04 — the best Linux distro for most VPS workloads (the commands also work on Debian)
- Root or sudo access — if your login hits user is not in the sudoers file, fix that before you start
- A domain name pointed to your server's IP address (for SSL)
- Your Node.js application code — either cloned via Git or transferred via SCP/SFTP
Step 1: Install Node.js LTS
Avoid installing Node.js from Ubuntu's default apt repository — it is often several major versions behind. Use the NodeSource repository for a current LTS release:
bashcurl -fsSL https://deb.nodesource.com/setup_lts.x | sudo -E bash - sudo apt install -y nodejs
Verify the installation:
bashnode -v npm -v
You should see something like v22.x.x and 10.x.x. If the output looks correct, proceed.
Step 2: Transfer and prepare your application
If your code is in a Git repository:
bashcd /var/www sudo git clone https://github.com/yourusername/yourapp.git sudo chown -R $USER:$USER /var/www/yourapp cd /var/www/yourapp npm install --production
Using --production skips development dependencies (testing tools, build tools) that should not run on a production server.
If your application requires a build step (Next.js, TypeScript, etc.) — for a dedicated Next.js walkthrough, see How to Host a Next.js App on a VPS:
bashnpm run build
Create a .env file if your application requires environment variables:
bashnano /var/www/yourapp/.env
Add your production environment variables. Never commit .env files to version control.
Step 3: Test the application directly
Before setting up PM2 and Nginx, confirm the application runs correctly:
bashcd /var/www/yourapp node server.js # or: npm start
Open a second SSH session and test:
bashcurl http://localhost:3000
If you get a response, the application itself is working. Stop it with Ctrl+C and proceed to PM2 setup.
Step 4: Install and configure PM2
PM2 is a production process manager for Node.js. It keeps your application running after crashes, restarts it on server reboots, handles log management, and provides a monitoring dashboard. The same pattern works for any long-running Node process — it's exactly how you host a Discord bot on a VPS 24/7, for example. If you have not chosen a server yet, compare the VPS requirements and budget options for Node.js separately.
Install globally:
bashsudo npm install -g pm2
Start your application with PM2:
bashcd /var/www/yourapp pm2 start npm --name "myapp" -- start
Or if you want to start a specific file:
bashpm2 start server.js --name "myapp"
Save the current process list so PM2 knows what to restart after a reboot:
bashpm2 save
Generate and install the startup script that runs PM2 on boot:
bashpm2 startup
This command outputs a sudo env PATH=... command — copy and run that command exactly as shown in your terminal. It configures systemd to start PM2 automatically.
Useful PM2 commands:
bashpm2 status # Show all running processes and their status pm2 logs myapp # View application logs in real time pm2 logs myapp --lines 100 # View last 100 lines of logs pm2 restart myapp # Restart the application pm2 stop myapp # Stop the application pm2 delete myapp # Remove from PM2 process list pm2 monit # Interactive CPU and memory monitor
After running pm2 status, confirm your application shows as online. If it shows errored, check logs with pm2 logs myapp to diagnose the problem.
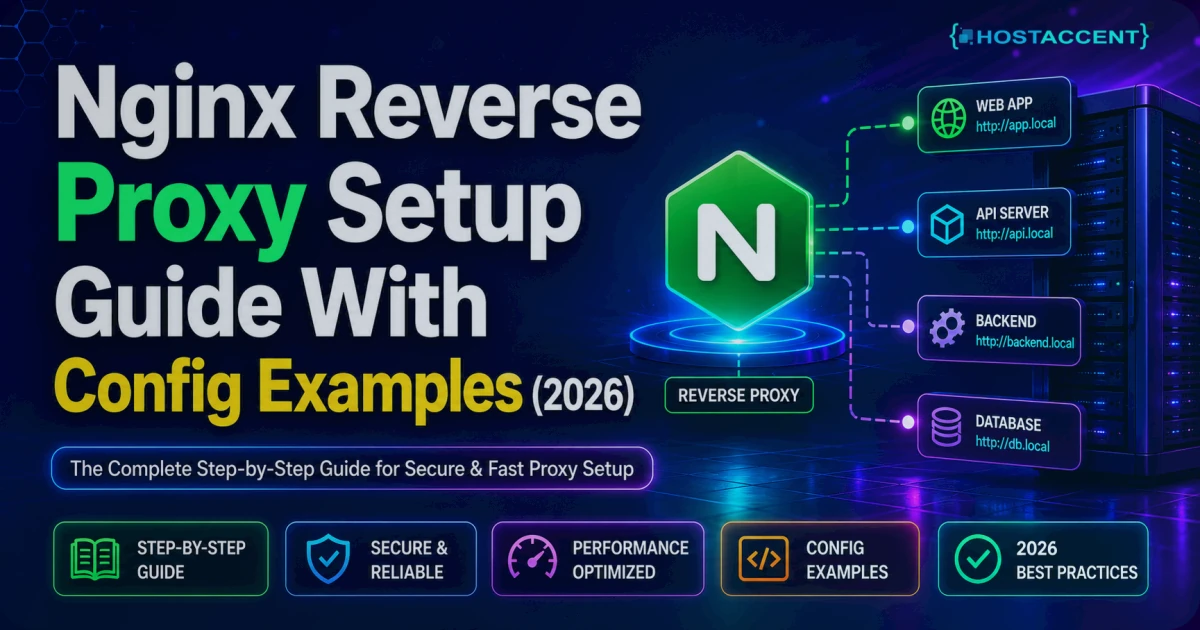
Step 5: Configure Nginx as a reverse proxy
Your Node.js application runs on a local port (typically 3000). Nginx sits in front of it, accepting traffic on ports 80 and 443, then forwarding requests to your app.
Create the Nginx configuration file:
bashsudo nano /etc/nginx/sites-available/myapp
Paste:
nginxserver { listen 80; server_name yourdomain.com www.yourdomain.com; # Security headers add_header X-Frame-Options "SAMEORIGIN"; add_header X-Content-Type-Options "nosniff"; add_header X-XSS-Protection "1; mode=block"; location / { proxy_pass http://127.0.0.1:3000; proxy_http_version 1.1; proxy_set_header Upgrade $http_upgrade; proxy_set_header Connection 'upgrade'; proxy_set_header Host $host; proxy_set_header X-Real-IP $remote_addr; proxy_set_header X-Forwarded-For $proxy_add_x_forwarded_for; proxy_set_header X-Forwarded-Proto $scheme; proxy_cache_bypass $http_upgrade; proxy_read_timeout 90; } # Serve static files directly from Nginx (faster than proxying through Node) location /static/ { root /var/www/yourapp/public; expires 30d; add_header Cache-Control "public, no-transform"; } }
Replace yourdomain.com with your actual domain and adjust the port (3000) and static files path as needed.
Enable the site and test:
bashsudo ln -s /etc/nginx/sites-available/myapp /etc/nginx/sites-enabled/ sudo nginx -t sudo systemctl reload nginx
The nginx -t step is critical — never reload without testing first.
Step 6: Configure the firewall
bashsudo ufw allow OpenSSH sudo ufw allow 'Nginx Full' sudo ufw enable sudo ufw status
Nginx Full opens both port 80 (HTTP) and port 443 (HTTPS). OpenSSH ensures you do not lock yourself out of SSH access.
Do not open port 3000 (or whatever port your Node app runs on) publicly — it should only be accessible internally via Nginx. Verify:
bashsudo ufw status
Confirm port 3000 is not listed as allowed.
Step 7: Add SSL with Let's Encrypt
Once your domain DNS is pointing to your server's IP and propagation is complete (verify with dig yourdomain.com or a DNS checker tool):
bashsudo apt install certbot python3-certbot-nginx -y sudo certbot --nginx -d yourdomain.com -d www.yourdomain.com
Certbot will modify your Nginx configuration automatically to add SSL and set up HTTP-to-HTTPS redirects. It also configures auto-renewal via a systemd timer.
Verify auto-renewal works:
bashsudo certbot renew --dry-run
If this passes without errors, your SSL will renew automatically before expiry.
Step 8: Deploy updates without downtime
When your code changes, you need a deployment process that updates the application without extended downtime.
Zero-downtime update flow:
bashcd /var/www/yourapp git pull origin main npm install --production npm run build # if applicable pm2 reload myapp # graceful reload: starts new workers before killing old ones
pm2 reload (not pm2 restart) performs a graceful reload — it starts the new version of your app in a new worker, waits for it to be ready, then stops the old worker. This results in zero-downtime deployments for most applications.
For applications that cannot do graceful reloads (stateful connections, etc.), pm2 restart is safer:
bashpm2 restart myapp
Post-deployment checklist
Before considering a deployment complete:
pm2 statusshows the application asonlinesudo nginx -tpassescurl https://yourdomain.comreturns a valid response- HTTPS is active (check for padlock in browser)
- SSL auto-renewal is confirmed (
certbot renew --dry-runpasses) - Application logs show no errors (
pm2 logs myapp --lines 50) - Firewall allows only necessary ports (
sudo ufw status)
Handling multiple applications on one server
If you need to run multiple Node.js applications on the same VPS, each gets its own:
- Internal port (3000, 3001, 3002...)
- PM2 process name
- Nginx server block with a different
server_name
They all share the server's resources. Monitor total RAM and CPU usage with pm2 monit to ensure you are not overprovisioning the server.
Final recommendation
This setup handles the vast majority of Node.js production deployments reliably. PM2 covers process management and recovery. Nginx covers SSL, proxy, and static file serving. UFW covers network exposure.
The main risk to avoid after setup is SSH-ing in to make changes "just quickly" without going through the deployment process. Ad-hoc changes that are not tracked break predictably and are hard to debug. Treat your production server as something you deploy to, not something you edit directly.
HostAccent Cloud Hosting — scalable cloud infrastructure for growing businesses.


Discussion
Have a question or tip about this topic? Share it below — your comment will appear after review.